Master the artwork of Photeeq lens flare to create lovely, cinematic pix. Learn expert recommendations on controlling mild results, improving assessment.
Introduction to Photeeq Lens Flare
Have you ever captured a photo only to discover an sudden streak of mild that provides a paranormal touch? That’s the beauty of lens flare! With Photeeq, you could include this enchanting effect and take your photography to another degree. Photeeq offers equipment that expertly simulate lens flare, giving your images an inventive edge. Whether you’re operating with herbal daylight or growing the impact put up-system, know-how lens flare can increase your pictures. Let’s dive deeper into how you can grasp this impact with Photeeq.
Understanding Lens Flare in Photography
When it involves adding a bit of magic on your photographs, Photeeq Lens Flare is a awesome approach that could raise an ordinary shot into some thing outstanding. However, getting to know lens flare calls for a few expertise and creativity. Let’s discover what lens flare clearly is, the technological know-how behind it, and the way you could use it to boost your pictures.
What is Lens Flare?
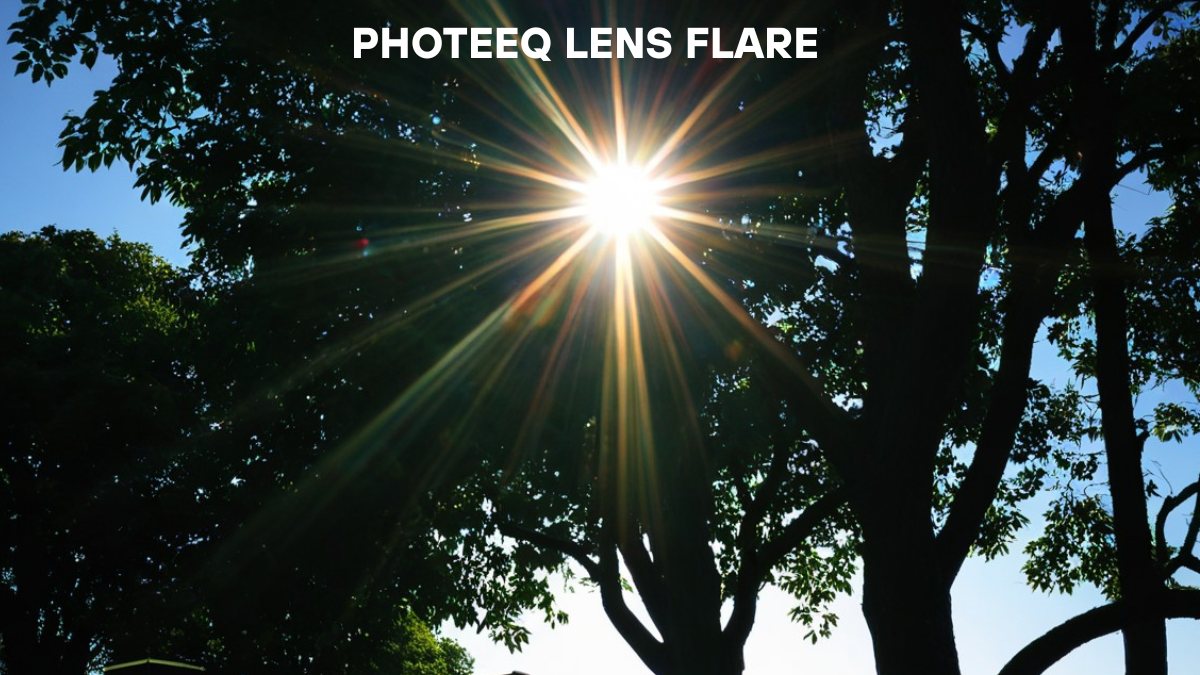
Lens flare occurs whilst a sturdy mild source, consisting of the solar, hits the camera lens immediately or reflects within it, developing an array of light spots or shapes. These results can occur as starbursts, streaks, or maybe a gentle haze that adds a creative glow to your snap shots.
While in the beyond lens flare was regularly visible as an undesirable effect, cutting-edge photographers have come to embody it, the use of it to craft visually lovely and particular photographs. When handled skillfully, lens flare can beautify the temper, add intensity to a scene, and imbue your pix with warmth and vibrancy.
The Science Behind Lens Flare
The magic of lens flare may seem spontaneous, but it boils right down to a piece of clinical trickery. Essentially, lens flare takes place while light enters the lens and displays or refracts most of the more than one glass factors inside it. These internal reflections both scatter mild erratically or listen it into great shapes.
Factors influencing lens flare encompass the type of lens, the range of glass elements interior your lens, and the attitude of the light supply. Wide-angle lenses, for instance, are extra vulnerable to generating flare due to their construction. Likewise, flare may be tormented by the best of lens coatings, which in particular aim to limit undesirable reflections and glare.
Creative Uses of Lens Flare in Photos
Photographers often use Photeeq Lens Flare creatively to inject life and emotion into their snap shots. Check out a few artistic makes use of of lens flare:
- Creating Atmosphere: Lens flare can create a dreamy and kooky vibe that enhances outdoor images and panorama pictures. By strategically positioning your digital camera in opposition to the sun or some other brilliant light source, you can create charming atmospheres.
- Leading the Eye: Flares can draw the viewer’s attention to a particular a part of an photograph. The mild can act as a visual guide that subconsciously leads the attention toward the main concern of the picture.
- Enhancing Drama: By permitting lens flare to occupy a part of the frame, photographers can evoke drama or nostalgia, especially for the duration of golden hour photography while the herbal mild is serene and heat.
Photeeq Lens Flare Tools and Features
Now that we apprehend the strength of lens flare in pictures, let’s dive into Photeeq’s gear that help you best this technique in your post-processing workflow.

Overview of Photeeq’s Lens Flare Options
Photeeq, known for its person-pleasant picture enhancing equipment, offers a set of lens flare alternatives designed to enhance your snap shots. These tools allow photographers to add and manipulate digital lens flares with precision and creativity.
- Predefined Effects: Photeeq boasts an array of predefined lens flare results that variety from subtle glows to extreme starbursts. These can quick be implemented to beautify your pics with only some clicks.
- Adjustment Sliders: Users can finely tune elements together with intensity, size, and shade of the flare, offering greater control over the very last appearance.
- Positioning Flexibility: With Photeeq, you may without problems drag and reposition the flare to exactly in which you want it, ensuring that it complements your composition flawlessly.
Comparison with Other Editing Tools
When comparing Photeeq with other photograph modifying tools like Adobe Photoshop or Lightroom, numerous differences come to light:
- Ease of Use: Photeeq is designed with novices and intermediate users in thoughts, making its gear extra handy without a steep learning curve. Many modifying equipment offer comparable effects however with a more complex manner.
- Speed and Efficiency: Photeeq shall we customers practice beautiful lens flare outcomes quick, while other software program can also require greater time-extensive changes and layer control.
- Cost Efficiency: Compared to high-give up editing software program, Photeeq offers a more low priced alternative with out sacrificing exceptional, making it accessible to a much broader variety of photographers.
Customizing Flare for Your Image
To make the most of Photeeq’s lens flare tools, personalization is prime. Here’s how you may personalize the flare for your image:
- Start with a Clear Vision: Before diving into Photeeq, don’t forget the mood and message you need your picture to convey. Determine whether or not you need a subtle touch or a formidable declaration with the flare.
- Experiment with Positioning: As you role your lens flare, consider how the mild naturally interacts together with your difficulty. Placing the flare so it mimics natural light sources provides realism for your picture.
- Adjust Intensity: Depending to your photo, you may want a gentle glow or a strong flare. Use Photeeq’s sliders to alter intensity, making sure the effect aligns with your typical aesthetic.
- Color Matching: Make sure the colour of your flare complements the tones in your image. This can beautify cohesiveness and save you the flare from looking out of area.
In conclusion, Photeeq lens flare gear provide an fantastic manner to creatively decorate your images. By knowledge len flare and making thoughtful adjustments in editing, you can raise your pics and provoke your target audience with stunning visible effects.
Techniques for Applying Lens Flare in Photeeq
Lens flare can breathe existence into your pix, including an artistic and dynamic detail whilst carried out properly. If you’re using Photeeq to obtain this effect, it’s essential to realize the techniques which could transform an amazing picture into a outstanding one. Let’s dive into how you can make the maximum of len flare with Photeeq!
Selecting the Right Flare for the Scene
The first step in mastering lens flare with Photeeq is deciding on the right one on your specific scene. Not all lens flares are created identical—a few are subtle and delicate, while others are formidable and dramatic. It’s critical to select a flare that enhances your scene in preference to clashing with it.
- Natural Scenes: If you’re operating with beach or sundown pics, opt for heat, golden flares to beautify the natural light.
- Urban Environments: For metropolis nightscapes, cooler or even multi-colored flares can upload a hint of vibrancy.
- Portraits: Softer flares can add a dreamy best with out overwhelming the challenge.
Take the time to preview distinct flare alternatives in Photeeq. Experiment with various sorts and see how they interact with the present light for your photo. The perfect flare should look like it belongs there, naturally extending from the mild source.
Adjusting Flare Intensity and Placement
Once you have picked the suitable flare, it’s time to adjust its depth and site. This step is prime to creating the impact look practical and polished.
- Intensity: You can tweak the opacity of the flare in Photeeq. Start by lowering the depth to see the way it influences the photograph, and then slowly increase it until you strike the right balance. Too a good deal flare can wash out information, even as too little can also make it unnoticeable.
- Placement: Where you place the flare can dramatically trade the temper of the photograph. Aligning the flare with existing mild resources like the solar or streetlights is often the pleasant strategy. Use Photeeq’s intuitive interface to pull and drop the flare into role, making sure it complements as opposed to distracts.
Remember, the goal is to direct the viewer’s eye to the focus of the image, and cautious adjustment of flare intensity and location is crucial in guiding that gaze.
Layering Flares for Complex Effects
For folks that love to add a unique touch to their photographs, layering flares can create complicated and intriguing visuals. Photeeq permits you to stack flares creatively to gain multi-dimensional consequences.
- Layering Different Types: You can attempt combining one-of-a-kind flare styles for a richer composition. For instance, a subtle haze can function a base layer, with a greater defined flare on pinnacle.
- Varying Opacity: Adjusting the opacity of layered flares ensures every provides its element with out overpowering the rest.
- Blending Modes: Experiment with blending modes in Photeeq to see how one of a kind settings change the interplay between layers. Some modes can enhance the intensity, even as others might introduce exciting color overlays.
Layering takes practice, but it’s fairly rewarding. It’s a chunk like composing track—each layer contributes to a harmonious entire.
Tips for Enhancing Your Photos with Photeeq Lens Flare

Enhancing your images with lens flare isn’t pretty much strategies—it’s about artistry. Here are a few guidelines to help you bring out the quality on your photos the usage of Photeeq’s lens flare consequences:
- Consider the Photo’s Atmosphere: Before adding a flare, reflect onconsideration on the temper you are aiming to rouse. A vibrant, outstanding flare can bring electricity and exhilaration, at the same time as a subdued, smooth flare may evoke tranquility or nostalgia.
- Avoid Overuse: While lens flare can be stunning, overdoing it can make your photograph appearance much less expert. Use it sparingly to decorate key pictures in preference to as a crutch for every picture.
- Focus on Composition: Even with lens flare, the fundamentals of images—composition, balance, and cognizance—stay essential. Ensure your flare adds to the composition as opposed to disrupting it.
- Play with Color Palettes: Lens flare can slightly alter the colours to your photo. Use this on your advantage via making sure that the flare’s color tones match or supplement the existing colours for your photograph.
- Stay Authentic: Always purpose for authenticity. The exceptional lens flares appear to be they’re evidently a part of the scene. If viewers query the truth of the flare, it’d detract from the image’s average effect.
- Seek Feedback: It’s easy to fall into innovative ruts. Sharing your paintings with fellow photographers or on social media can provide new insights and inspiration, keeping your lens flare utilization clean and progressive.
By following these tips, you may make certain that your use of lens flare no longer most effective complements your pics but additionally elevates your photographic capabilities to an entire new stage. Happy flaring!
Conclusion
Mastering the lens flare impact in Photeeq can without a doubt raise your pictures recreation. By experimenting with distinctive patterns and tweaking the settings, you may be capable of create pix that feel both magical and vibrant. Remember to:
- Always recollect the context of your photograph.
- Use lens flare to enhance the mood, not overshadow the challenge.
- Experiment with placement for creative results.
With these gear in your modifying arsenal, you’re now prepared to make your snap shots shine!